built-in wired Ethernet LAN + supported Wi-Fi adapter through HOST USB + supported cellular adapter through HOST USB
The documented network paths available to the camera or its required transmitter.
● Manufacturer-documented path
The GY-HC500 can upload clips automatically, manually, or in HD+Web proxy chunks to destination-neutral FTP, SFTP, implicit FTPS, or explicit FTPES servers. Wired Ethernet is built in; supported HOST USB adapters add Wi-Fi or cellular connectivity. Four Clip Server profiles and resume support cover both rapid proxy delivery and full-clip handoff.
Direct camera client
The documented network paths available to the camera or its required transmitter.
File behavior is quoted conservatively until a Camera to Anywhere fixture reproduces it.
Transfer can begin from the documented camera-side behavior shown here.
High-Speed recording disables clip FTP. Automatic chunked upload is limited to supported record configurations. Use current firmware; FTP resume is unavailable with SFTP. Physical Camera to Anywhere interoperability is not yet lab-verified.
Menu labels, behaviors, and warnings on this page are paraphrased from official manufacturer material.
Inspect every citation ↓Gather these items first, then enter the Camera to Anywhere job credential exactly as issued. The camera sends to the public ingest edge; your private destinations stay downstream.
Current GY-HC500 firmware.
Built-in Ethernet or a supported HOST USB Wi-Fi/cellular adapter.
A recorded test clip; HD+Web proxy configuration for chunk testing.
Camera to Anywhere host, protocol, port, credentials, and destination path.
Approved server fingerprint for a secure protocol.
Identifies the profile in upload controls.
Matches the ingress listener.
Identifies Camera to Anywhere ingress.
Connects to the correct service.
Routes assets to the correct workflow.
Authenticates and attributes the camera.
Completes authentication.
Uses firewall-friendly passive data connections.
Defines the automatic source and destination.
Controls the chunk cadence during recording.
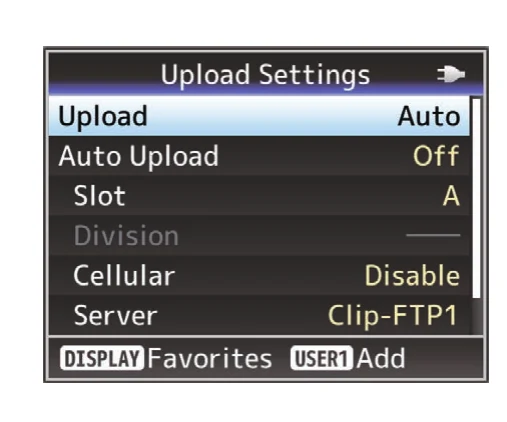
Upload Settings groups the automatic/manual mode, source slot, division interval, cellular allowance and server preset on one screen.
JVC GY-HC500/GY-HC550 Instructions · PDF p. 190 ↗Instructional excerpt from an official JVCKENWOOD manual; copyright remains with JVCKENWOOD.Upload Settings groups the automatic/manual mode, source slot, division interval, cellular allowance and server preset on one screen.
JVC GY-HC500/GY-HC550 Instructions · PDF p. 190 ↗Instructional excerpt from an official JVCKENWOOD manual; copyright remains with JVCKENWOOD.Upload Settings groups the automatic/manual mode, source slot, division interval, cellular allowance and server preset on one screen.
JVC GY-HC500/GY-HC550 Instructions · PDF p. 190 ↗Instructional excerpt from an official JVCKENWOOD manual; copyright remains with JVCKENWOOD.Upload Settings groups the automatic/manual mode, source slot, division interval, cellular allowance and server preset on one screen.
JVC GY-HC500/GY-HC550 Instructions · PDF p. 190 ↗Instructional excerpt from an official JVCKENWOOD manual; copyright remains with JVCKENWOOD.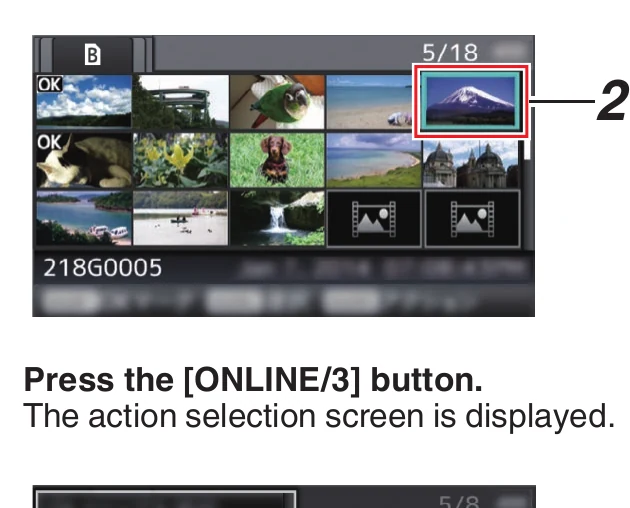
In Media mode, move the cursor to the clip and press ONLINE/3 to open the action menu.
JVC GY-HC500/GY-HC550 Instructions · PDF p. 191 ↗Instructional excerpt from an official JVCKENWOOD manual; copyright remains with JVCKENWOOD.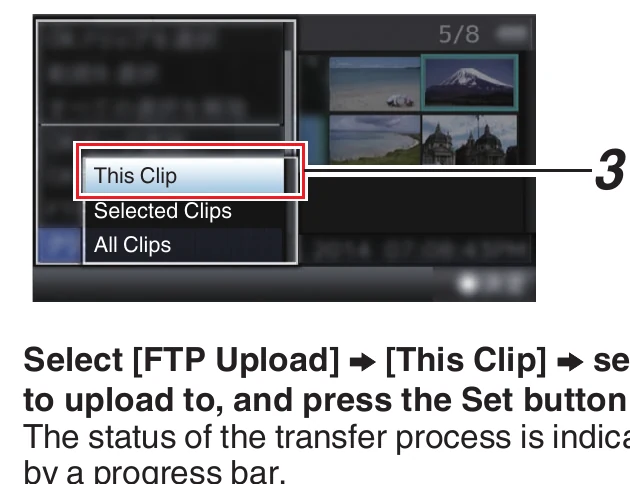
Choose This Clip, Selected Clips or All Clips, then choose the server preset and press Set.
JVC GY-HC500/GY-HC550 Instructions · PDF p. 191 ↗Instructional excerpt from an official JVCKENWOOD manual; copyright remains with JVCKENWOOD.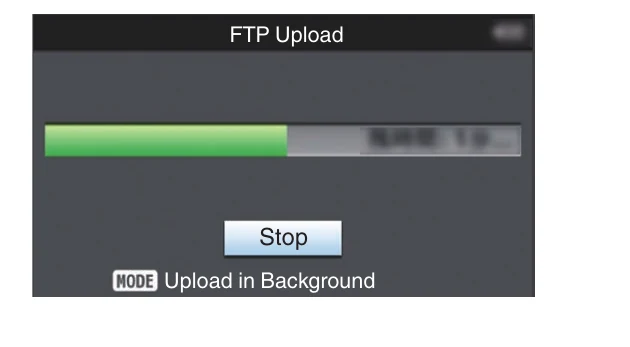
The FTP Upload screen displays transfer progress and provides a Stop control while background upload is active.
JVC GY-HC500/GY-HC550 Instructions · PDF p. 191 ↗Instructional excerpt from an official JVCKENWOOD manual; copyright remains with JVCKENWOOD.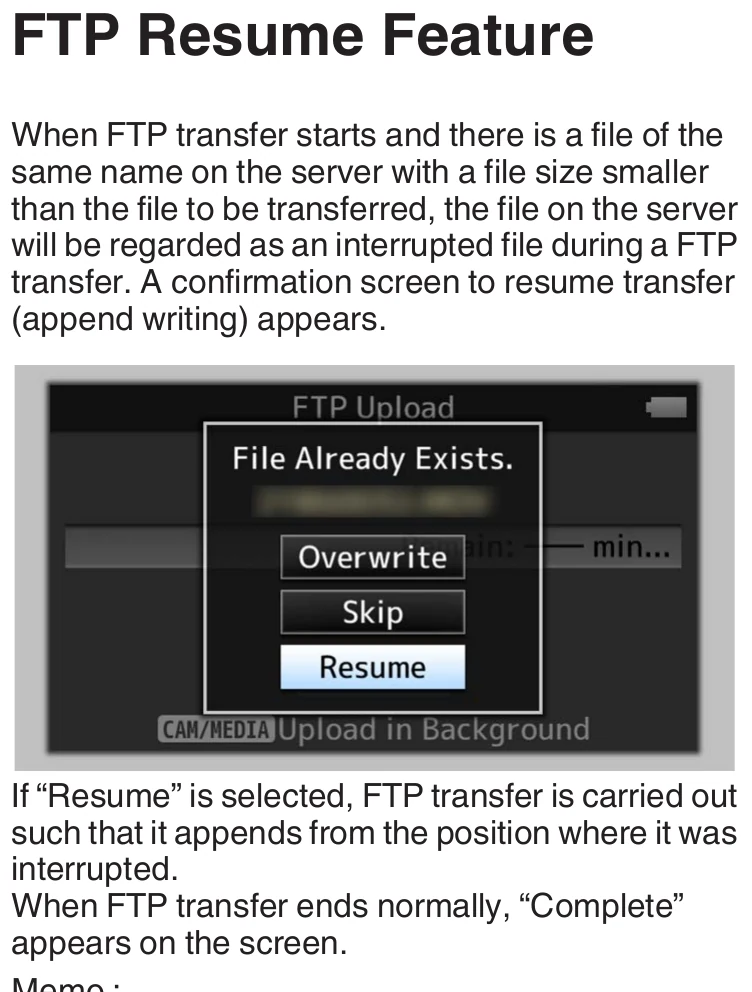
Resume appears only when the server has a smaller partial file with the same name; the manual notes protocol-specific restrictions.
JVC GY-HC500/GY-HC550 Instructions · PDF p. 193 ↗Instructional excerpt from an official JVCKENWOOD manual; copyright remains with JVCKENWOOD.Run this checklist on the exact body, firmware, network, and media format you will use on assignment.
Set Upload to Auto, select Slot and Server, turn Auto Upload On, and leave High-Speed mode.
Record to a different slot from the one configured for auto FTP.
Use System HD+Web, proxy Slot B, Division not Off, and Auto Upload On.
Verify Server, Port, Protocol, Username, Password, Dir. Path, and account permissions.
Confirm a resume-capable non-SFTP endpoint, no HTTP proxy, and a valid smaller partial file.
The local archive is retained for research continuity if an official link changes. It is not redistributed through this site.
Printed pp. 148-150, Upload Settings and Clip Server; pp. 189-193, Auto FTP, chunked upload, Manual FTP, and Resume
Open manufacturer source ↗This guide compiles all discovered FTP-related setup evidence for this model, but it is not a promise that every firmware version and venue network will behave identically. Verification records the exact body, firmware, access point, protocol, payload, and result.
Join the founding beta and help turn the documented route into a tested setup guide with original menu photography.
Test this path ↗